

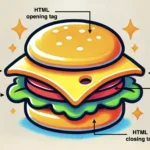
In order to create a web page, it is necessary to use HTML elements. These tags, also known as components represent the fundamental building blocks of a webpage. Each tag consists of:
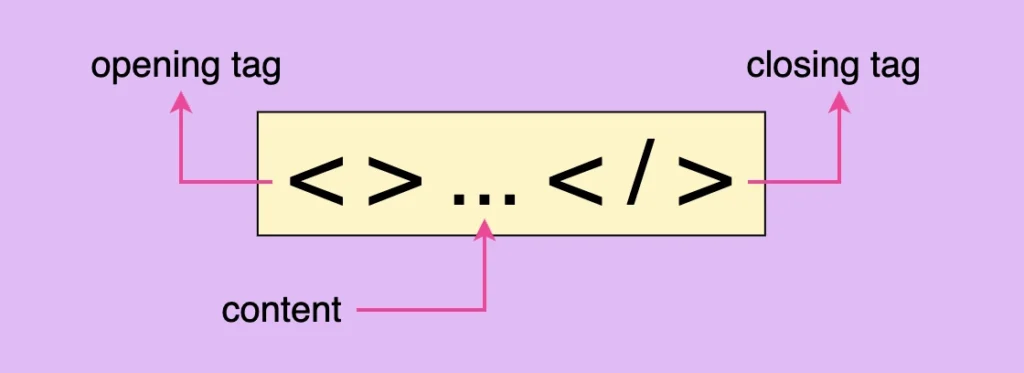
- the opening tag
< >declare the beginning of an element and contains its characteristics, which are called attributes. - the closing tag
</ >declare the end of an element. - it’s content <>
...</> element’s content is accommodated within this space.
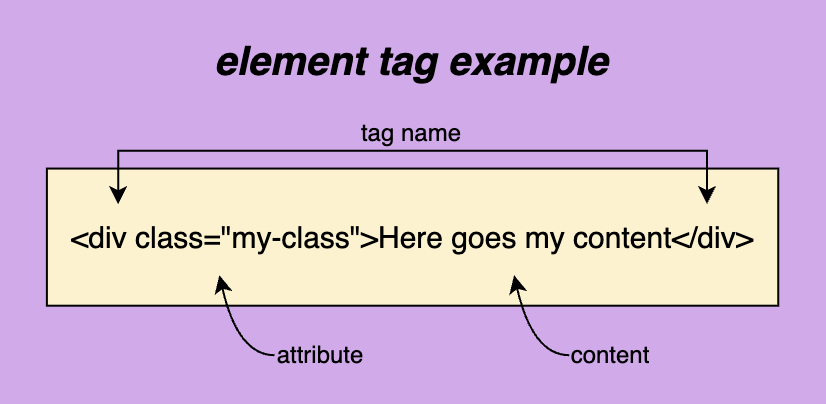
Here are some examples of how to construct HTML elements.
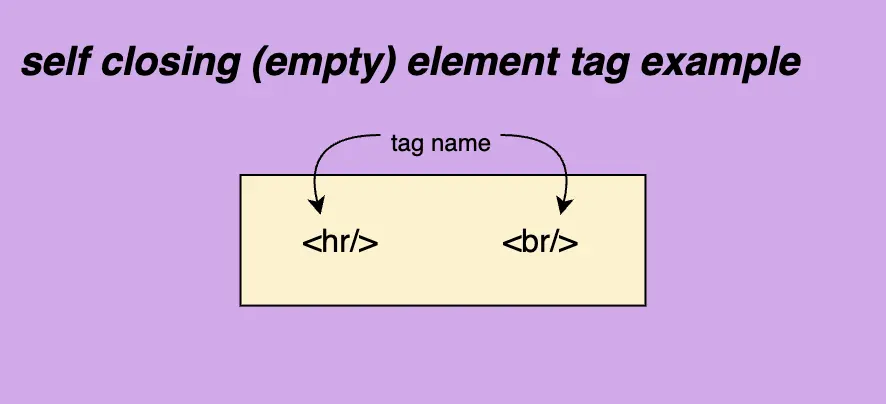
There are also some self-closing tags <.../> which means they have only one tag and no content. Some self-closing tags e.g <img/> have attributes and some don’t, like <hr/> and <br/>.

📝 Regarding closing tags, you may see them closing in the following ways:
<br><br/><br />
All three types are valid and you are free to use whichever you prefer. In our case, I’ll be using the closure slash without a space.
HTML elements
The <html> tag is required and is the container of all tags. It defines how the browser will present the document. In order to be functional we have to add the <head> tag and the <body> tag with their content.
<!DOCTYPE html>
  <head>
    <!-- head elements here -->
  </head>
  <body>
    <!-- body elements here -->
  </body>
</html>You may also like 🎬

Head elements
<head>...</head>
The head tag has a crucial role in our HTML document. It is the container for adding all required information, in order to upload the document on the browser. Anything included in the head element, though, is not displayed on the browser. Each document can have only a single head element. A list, of head tags and their usage, is shown below:
<head>
  <base/>
  <link/>
  <meta/>
  <style></style>
  <title></title>
</head>base
<base/>
The base tag is the one we use when specifying the base URL for our document/site. It is the one used when creating relative URLs. For example, if we would like to add as a base URL for our site we would do something like:
<base href="https://noghostsinside.com/"/>link
<link/>
It’s the tag that specifies a connection between our document and another source. Some of the most commonly used attributes are, the rel , the type and the href attribute.
rel shows the relationship between the two parts, type shows the type of resource linked to the document, and last (but not least) href gives the path to the resource, in simple words it is the resource’s address. type is an optional attribute and therefore can be omitted. The resource we are connecting our document to could be internal (inside our project’s folder) or external e.g another website.
In the example below you can see that I connect my HTML page with a CSS stylesheet (internal file) and a font awesome icons resource (external file).
<link rel='stylesheet' type="text/css" href='styles.css'/>
<link rel="stylesheet" href="https://fontawesome.com/3.2.1/css/font-awesome.css"/>meta
<meta/>
It provides information about the document’s data, it’s data about data!
For example, if you want to provide information about the author who wrote the page or the keywords which are responsible for the search engine optimization you can use the code below.
<meta name='author' content='Marilena'>
<meta name="keywords" content="HTML, CSS">style
<style>...</style>
Is a special HTML element, you can use to add styles (CSS) to your web page. It helps you to modify the presentation and layout of your web page. In simple words, it allows you to customize characteristics like fonts, sizes, and colors so that your web page looks the way you prefer. Additionally, it is important to know that when you implement elements using <style> they may override other stylings you have probably added to your CSS (depending on your CSS rules specificity).
For example, if you want to apply green font-color to all h1 (headings) and font-size 12px to all paragraphs on your web page you can use a style tag as seen below. This code will apply green color to all h1 tags and a 12px font size to all paragraphs.
<style>
  h1 {
    font-color: green;
  }
  p {
    font-size: 12px;
  }
</style>You may also like 🎬


title
<title>...</title>
The title tag is an HTML element used to define the title of a web page. It is placed within the <head> section of an HTML document and is not visible on the actual page but is displayed on the browser’s title bar or tab
<title>No Ghosts Inside</title>You may also like 🎬


Body elements
<body>...</body>
This required element is the container of all tags we use to create the structure — the appearance — of the document. Only one body element can be in each document. Anything contained in the body tag is displayed on the browser.
<body>
  <h1>Hellow there</h1>
  <p>How are you today? Would you like to fill the form below and be a member?</p>
  <form>...</form>
  <button>Submit</button>
  <div>No Ghosts Inside Family Welcomes You!</div>
  ...
</body>navbar
<nav>...</nav>
This tag defines a section of navigation links, such as all those in a navigation bar. It emphasizes the semantic structure of a web page, making navigation links more accessible and easier to identify for both users and search engines.
The provided code snippet shows how to create a simple navigation bar using the <nav> element. Inside the <nav> tag, an unordered list (<ul>) is used to organize navigation links as list items (<li>). Each list item contains an <a> tag, which represents a hyperlink. This structure is visually organized and semantically meaningful, as the <nav> element displays a block of navigational content, improving accessibility for screen readers and helping search engines understand the site’s structure. This layout is a basis for building user-friendly and responsive navigation menus.
<nav>
  <ul>
    <li><a href="#home">Home</a></li>
    <li><a href="#about">About Us</a></li>
    <li><a href="#design">Design</a></li>
    <li><a href="#contact">Contact</a></li>
  </ul>
</nav>🔖 By default, the list has a vertical orientation as HTML documents naturally have a vertical flow of content. To style the navigation bar into a horizontal layout or add other design elements like spacing, colors, and hover effects, CSS must be applied. 🤔 ✨
anchor
<a>...</a>
We will use this tag If we want to create a hyperlink. It is necessary to include the href="" value where we set the address of the link we want to visit which can be an internal URL href="./..." or an external one href="https://noghostsinside.com/about-us/".
It is optional but really helpful to include target="_blank" value if we want our link to open in a different tab. Its default value is target="_self" and it opens the link to the current browsing context, the same page.
<a href="./..." target="_blank">Check our new post</a>
<a href="https://noghostsinside.com/" target="_blank">No Ghosts Inside</a>address
<address>...</address>
This HTML tag provides contact information about a person or an organization.
<h1>Contact with the author</h1>
<address>
  <a href="mailto:hello@noghostsinside.com">hello@noghostsinside.com</a>
</address>article
<article>...</article>
The article tag is used for specifying content independence, its content should be self-contained and have its own meaning. Examples of such usage could be a newspaper article, a forum or a blog post.
<article>
  <h1>Explore India</h1>
  <img/> <!-- An image that shows India -->
  <h2>India's Top Ten Attractions</h2>
  <p>Here goes text about India's attractions</p>
  <h2>India's Food</h2>
  <p>Here goes text about India's cusine</p>
</article>
<article>
  <h1>Explore Tanzania</h1>
  <img/> <!-- An image that shows Tanzania -->
  <h2>Tanzania's Top Ten Attractions</h2>
  <p>Here goes text about Tanzania's attractions</p>
  <h2>Tanzania's Food</h2>
  <p>Here goes text about Tanzania's cusine</p>
</article>button
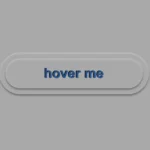
<button>...</button>
Defines a button we want to introduce to our document. It is interactive by the user and represents an action. It may contain text, icons, or even images. Including the type="button" attribute is crucial for declaring and rendering it properly within the browser.
Below, you can see a button I create for you to understand it better. It would be nice to add CSS to make it prettier! 😉
<button type="button" class="my-button">
  Submit
</button>You may also like 🎬
div
<div>...</div>
The division tag is the most common tag and defines a section in the document. HTML5 introduced some new tags, like section and footer, to provide a more descriptive way of splitting a document’s contents. Before that, the div tag was the primary choice, and often resulted in a situation referred to as “div hell”.
<div>
  Lorem ipsum dolor sit amet consectetur adipisicing elit. Maxime mollitia,
  molestiae quas vel sint commodi repudiandae consequuntur voluptatum laborum
  numquam blanditiis harum quisquam eius sed odit fugiat iusto fuga praesentium
  optio, eaque rerum! Provident similique accusantium nemo autem.
</div>footer
<footer>...</footer>
It represents the content that appears at the bottom of a webpage and usually includes additional information such as contact details, navigation links, sitemaps, and copyright information.
<footer>...</footer>image
<img/>
This tag helps us to insert an image into our document. It is necessary to include the src attribute that sets the path of the image we want to display on the browser. Additionally, the alt attribute plays a crucial role by providing information about the image. The information is utilized by screen readers, benefiting individuals with reading disabilities. It is also recommended by SEO guidelines and appears when the image fails to load correctly (e.g. broken image link cases). Further attributes that can be added include width and height allowing us to define the dimensions of our image. By using images we can beautify our content and make it more attractive and explanatory.
<img src="source" alt="alternative text" style="width:100px; height:100px;"/>
<img src="source" alt="alternative text" width="100" height="100"/>You may also like 🎬


heading
<h1>...</h1> <h2>...</h2> <h3>...</h3> <h4>...</h4> <h5>...</h5> <h6>...</h6>
We have six heading tags. From <h1> which is the biggest to <h6> which is the smallest based on their font-size. All headings have a default size, which can be modified using CSS. Headings are extremely important as they give emphasis and they provide brief information about our document.
<h1>...</h1> <!-- largest heading -->
<h2>...</h2>
<h3>...</h3>
<h4>...</h4>
<h5>...</h5>
<h6>...</h6> <!-- smallest heading -->list
<li>...</li>
We have ordered <ol> list that can be either numerical or alphabetical and the unordered <ul> list that utilizes bullet points.
Additionally, there is a description <dl> list that is used when we want to display terms along with their corresponding descriptions. It consists of the <dl> tag (a description list) which requires two elements. The first one is a <dt> tag, the description term element, and the second one is the <dd> tag, representing the description itself.
Keep in mind, that the <dd> element has somemargin-left set by default.
📝 Pay attention to the correct order, as <dt> tag always comes before <dd> tag.
<li>
  <ol>First item</ol>
  <ol>Second item</ol>
</li>
<li>
  <ul>First item</ul>
  <ul>Second item</ul>
</li>
<dl>
  <dt>HTML</dt>
  <dd>
    The HyperText Markup Language or HTML is the standard markup language
    for documents designed to be displayed in
    a web browser.
  </dd>
  <dt>CSS</dt>
  <dd>
    Cascading Style Sheets is a style sheet
    language used for describing the presentation of a document written
    in a markup language such as HTML or XML.
  </dd>
</dl>You may also like 🎬
main
<main>...</main>
It specifies the most significant content that is unique in the whole document and should not be repeated across multiple pages. It must also not contain repeated content such as headers, logos, forms, or links and it can’t be the child of other sections like headers, navbars, footers, or sidebar elements.
<main>
  <h1>I am the main content</h1>
  <p>I am the first paragraph of the text</p>
  <p>I am the second paragraph of the text</p>
</main>paragraph
<p>...</p>
We set it when we add a new paragraph to the document. It is commonly used to separate blocks of text into individual paragraphs, making it easier to organize, read, and understand.
<p>
  I am the first paragraph for your content.
</p>
<p>
  I am the second paragraph for your content.
</p>section
<section>...</section>
This tag is used for separating an HTML document into distinct categories.
<h1>Making cake</h1>
<section>
  <h2>Ingredients</h2>
  <p>In order to make a cake we will need butter, flour, milk, cocoa and lemmons.</p>
</section>
<section>
  <h2>Baking</h2>
  <p>We bake the cake in a preheated oven for 50 min at 160 degrees.</p>
</section>span
<span>...</span>
Is an inline container. We use span when we want to manipulate a specific part inside another HTML element.
<p>
  My garden has beautiful
  <span style="color:green">green</span>
  trees and
  <span style="color:yellow">yellow</span>
  flowers.
</p>You may also like 🎬
table
<table>...</table>
When we want to insert a table into our document we can use the <table> tag. To add any essential components of a table we can use <tr> for rows,<th> for headings and <td> for cells.
<table>
  <tr>
    <th>Country</th>
    <th>Capital</th>
  </tr>
  <tr>
    <td>France</td>
    <td>Paris</td>
  </tr>
  <tr>
    <td>Greece</td>
    <td>Athens</td>
  </tr>
  <tr>
    <td>Italy</td>
    <td>Rome</td>
  </tr>
</table>You may also like 🎬


Special element cases
comment
<!-- your comment -->
The HTML comment tag is really helpful as we use it to keep notes, which are not displayed on the browser when loaded. However, you have to be careful not to add any sensitive data inside a comment because even though it is not rendered in the browser’s view, it will show up to anyone who knows how to use the browser developer tools and check the HTML document elements.
<!-- Here goes my comment -->

<!--
  Here goes my comment when it is
  more than one line
-->script
<script>...</script>
The script tag is commonly known as a special container. It is basically a playground where we can include a set of instructions — a script — that the browser can understand and follow. We can add the instructions inside the tag or link them to an external file that contains our code. In both cases, when the browser reads the HTML document and reaches the script tag, it will try to read and execute what’s included.
<script>
  console.log('Hey! Welcome to No Ghosts Inside squad!');
</script>
<script src="our-script-file.js"></script>
<script src="https://www.noghostsinside.com/non-existent-script-file.js"></script>Enjoyed this piece? We’ve got more engaging content on HTML make sure to check it out.
🌼 Hope you found my post interesting and helpful. Thanks for being here! 🌼
